Monday, May 11, 2020

Hasegawa, P-47D Thunderbolt “Nose Art”, 1/48th Scale, Kit No. 09305 (Part IV)


The Thunderbolt needs little introduction.  It was a massive airplane for a fighter.  Fully loaded they could weigh upwards of eight tons and could carry a bomb load of 2,500 pounds.  Armed with eight .50 caliber machine guns, they packed a punch that could even sink ships the size of a destroyer, not to mention absolutely decimating armored columns and railroad trains.  The last Thunderbolts were retired in 1966 after serving in the Peruvian Air Force.

This model carries the markings of a fighter bomber squadron serving in Italy in 1944.  I configured it with a 500 pound bomb under each wing and no drop tank as tactical support missions were being flown at that time in Italy within reasonably short distances of U.S.Army Air Corps forward bases.

I have said all that there is to say about the build and finishing, so I will wrap this up by simply saying that these 1/48th scale Hasegawa kits have held up well over the past 20 years and are well worth building.


As always, thank you for visiting my blog.  Comments are always welcome.


Tuesday, May 5, 2020

Hasegawa, P-47D Thunderbolt “Nose Art”, 1/48th Scale, Kit No. 09305 (Part III)


In the last installment, I extolled the virtues of Vallejo Metal Color Airbrush Colors.  Vallejo says that they should be sealed with this product:

On previous models I used Microscale Micro Satin Clear Finish with good results over these Vallejo metal colors.  Micro Satin sealed the paint and the decals well enough that I was able to do some weathering with enamel based panel line paints.

In this case, I had two issues with this Gloss Varnish.  First, it takes a long time - several days - to dry unlike all other acrylic varnishes I have used.  Second, I used the Microscale system to apply the decals on this model.  I found that the Microscale solutions slightly softened the varnish making shifting the decal into position somewhat dicey if not done immediately.

That is a deal killer for me.  I will stick to using these metal colors in the future, but I will go back to my preferred sealing coat - Microscale Micro Satin.  Micro Satin gives me a realistic sheen, and it protects the underlying decals and paints from oil based paints and stains.  I intend to top coat this model with it.

Well, the decals are on thanks to an AeroMaster sheet I had in my collection, and I am close to getting it done.  And, thanks to the corona/Wuhan virus, I still have plenty of bench time.


As always, thank you for visiting my blog.  Comments are always welcome.


Sunday, May 3, 2020

Hasegawa, P-47D Thunderbolt “Nose Art”, 1/48th Scale, Kit No. 09305 (Part II)


The Thunderbolt project is coming along. In this segment, I want to deal with finishing.

I think most modelers avoid metallic finishes because they are so hard to apply and present so many problems.  (I admit I avoid them.  This Thunderbolt almost joined the RAF in India where they painted the airframes camouflage!)

Masking can be a nightmare as the metal finish comes right off with masking tape, even Tamiya tape with its minimal - but sufficient - grip.  Metallic finishes show every little flaw in the model’s surface.  And, they are very hard to apply so that they appear scale.

I have tried one product that seems to work okay, but it has some issues.  That product is the Vallejo Metal Color Airbrush Colors.  They airbrush easily and they stay put  when masked over with Tamiya tape. 


What’s not to love?  Well, the primer for one.  The gloss black primer sold with this line of paints is as hard to work with as the other Vallejo surface primers.  These primers are an acrylic-polyurethane product.  The stuff clings to the inside of my Grex airbrush, and after each use a thorough cleaning is necessary with airbrush cleaner followed by lacquer thinner.

Recently, I have been using Stynylrez surface primer.  It is a product of Badger Airbrush Co. and I highly recommend it.

Stynylrez is also an acrylic-polyurethane product.  However, it cleans up with airbrush cleaner followed by some lacquer thinner.  This primer has more of a satin finish than the Vallejo above which is gloss.  Frankly, I think Stynylrez would work with these metal paints.  I bought my Stynylrez on eBay in a three 2 oz. bottle pack of white, grey and black primer.  It provides an excellent paint base and you can use masking to your heart’s content.

After the metal color is applied, you should add a coat of gloss or satin varnish to protect the metal color while applying decals or using panel line paint or other weathering material.

These Vallejo Metal Color paints are a little expensive (aren’t they all?) but they get the job done.  I get mine at Spruebrothers.com.

Here I am using Tamiya masking tape and Post-It notes to mask a few panels on the Thunderbolt’s wings:
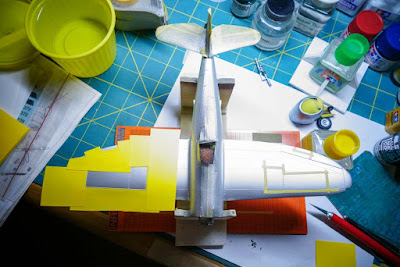
I outlined the area with thin strips of tape first, then finished with pieces of Post-It.


Picking out panels is fairly easy with these paints.
One of the handiest tools I have run across in years is the Infini Easycutting tool.  It is an  acrylic mat about 4” by 8”.  Laser-etched into the surface are straight lines from .4 to 1.0 mm wide.  You place a strip of masking tape down over the lines, and you can easily produce strips of tape in almost any width you can imagine.  All you need is a sharp #11 blade. 

It is so handy to be able to make thin strips of masking.  You can outline the area to be masked so much more easily with thin tape, and then you use wider tape to complete the masking with wider tape.  This is much easier than trying to use wide strips to start.

You will see brown area on the Infini on the photo below.  That is a piece of 3M Micropore bandaging tape.  I painted it khaki, and I cut 1.0 mm strips from it to make seatbelts for 1/72 scale airplanes.

Infini also makes at least two other Easycutting tools with circles and other shapes.


Well, it is on to decals, adding the bits and pieces, and a little weathering.  I will be back soon with the finished Thunderbolt.

 As always, thank you for visiting my blog.  Comments are always welcome.

Friday, April 24, 2020

Hasegawa, P-47D Thunderbolt “Nose Art”, 1/48th Scale, Kit No. 09305 (Part I)

I decided to have two blog entries on this build.  The kit has been in my stash for a while.  I have the time now to say a little more about this build, since as I write this we are deep in the Wuhan virus pandemic.  (Sorry if I offend anyone, but the whole world  knows and admits the virus originated somewhere in Wuhan, China, the exact location to be determined.)

I  built the Razorback version of this kit and presented it in this blog on July 9, 2017.

Hasegawa kits are less detailed, and thus less complex, than Tamiya kits in my experience.  Nonetheless, they are fun to build, and I wish they would release some additional kits this century. When I see “new” Hasegawa releases, they are the same old kits I have been seeing for decades.

My stash included the Jaguar P-47D Cockpit Detail Set (64805), which I believe is no longer in production.  I taped up the parts to it first thing to determine if it fit, and it did.  Hooray!  That is not always the case with some of these resin detail sets.  My research told me that Thunderbolts mostly had dark green interiors.  Testors Model Master Acryl Gunship Green was a good match.  Testors is dumping the Model Master line in favor of more craft oriented products.  I have found that Vallejo Camouflage Green in the Model Color line is a perfect match.  The "uninhabited" spaces of the P-47s were coated with yellow zinc chromate, a color available from Vallejo in their Model Air line.  So, I guess I will not miss Model Master.  Over the past few years the line has been slipping away, so the ultimate demise came as no shock.

Hasegawa models are often provided with shiny, smooth surfaces, and this one was no different.  I think that will enhance the natural metal finish I intend to apply.  We will see.

Here are some progress photos:
Basic model done.  Part fit was excellent.


Some of the small parts painted.
I was very pleased the Jaguar resin cockpit fit so well.  It just dropped in.


The finished cockpit looks very nice.
A fret with the two dive brakes came with the kit.
Dive brakes installed.
As always, comments are welcome and thank you for visiting my blog.

Saturday, April 11, 2020

MPM, Gloster Meteor Mk I, 1/72, Kit No. 72567


This is the first and only Allied jet to enter operational serve e during WWII.  Clearly the British were miles ahead of the USA in jet  engine creation and manufacture.  The first American jets were powered with British engines.  While there was no jet-to-jet combat in WWII where the Meteor went up against the ME262, the Meteor Mk I effectively pursued and downed V-1 missiles over England.  There were teething problems to be sure, such as the cannons not being reliable and freezing at the wrong moment.  But the Meteor throughout its operational life proved to be a rugged, reliable and versatile aircraft.  Meteors downed Mig-15’s during the Korean War, and the Martin Baker Co. still has one flying as a testbed for new ejection seats.

If you want a Gloster Meteor Mk I in 1/72nd scale in your collection, this appears to be the only game in town for a readily available kit.  It is another product of Central Europe’s plastic kit powerhouse - the Czech Republic.

I do not know what the relationship is between MPM and Special Hobbies but they appear to be one and the same company, either through a name change or a merger.

According to Scalemates.com, the kit first appeared in 2006 as a Mk 9 Meteor.  This release was in 2011, and the kit includes many parts for other versions.  Releasing the Mk I was clearly an afterthought as many other marks were released first.

I found the part fit challenging in places, particularly the canopy.  As the kit fuselage was originally designed for later model canopy configurations, the Mk I canopy with its flat windshield was molded with a lip sticking out to cover that area of the fuselage that would be covered by the canopy in later marks.  I had the devil of a time trying to get it to fit, and I was not that successful. Once I broke the canopy on a 1/72nd model trying to make it fit, and I have since been very careful handling them.  As always, I blame myself and do not try to shift the blame to the manufacturer.  More skillful modelers have undoubtedly made it fit.

The each landing gear is made up of several parts that are a challenge to fit together correctly.  Instead of a straight oleo leg, the Brits designed the landing gear to flex at a knee joint.  I am no engineer, but this looked like another piece of British design that turned a 5 cent problem into a 50 cent solution.

Speaking of landing gear, I added 26 grams of lead birdshot in the nose and the engine nacelles to allow the model to sit on the landing gear.  The shot is placed in a convenient cavity (created with plastic card bulkheads where needed).  Then I pour Elmer’s wood glue over it to fix it in place as a single lump.  Never fails.

Main Colors Used (Vallejo Model Air):
    71.097  Base Grey (used for Dark Grey)
    71.022  Camouflage Green (used for Dark Green)
    71.049  Medium Sea Grey
    71.103  Grey (used for Sky)

Pros

Excellent subject.

Very nice decals for four versions, thin and easy to apply.

Cons
Fit could be better.

Cockpit could have been more detailed.

Mainer landing gear parts.  I am now using Tamiya Cement in most places I once used CA.  Given time to set and dry, this cement is very effective at keeping small parts fixed.

The lead shot is held in place by plastic card bulkheads I made along with Elmer's glue.


Sunday, April 5, 2020

Tamiya, M151A1 U.S. Utility Truck “Vietnam War”, 1/35 scale, Kit No. 35334

Aside from various types of 2 1/2 ton trucks, this is a vehicle I operated almost constantly while in the Army.  The all-purpose MUTT (military utility tactical truck).  They served in many roles.  With a quarter ton trailer behind them, quite a bit could be hauled.  They acted as scout vehicles, armored cars (with field conversions), ambulances, and weapons carriers, as well as simple troop transports.  And with the Davy Crockett short range nuclear armed ballistic missile mounted, the MUTT became a nuclear weapon! I always wondered if the missile would go far enough to keep from killing the crew firing it.

By the late 1980’s, the MUTT was being phased out of service.  Some  went to allied countries, but most were cut into two or four pieces and scrapped.  Really.  They were just destroyed.  I have never heard a real explanation for this, as they could have been sold to civilians.  There were some who believed that the fully independent suspension of the vehicle made them somehow too unsafe for civilian use (but apparently not armed forces use).  I think it was more that the Ford Motor Co. (the manufacturer), Jeep and others that wanted to sell new vehicles to us and wanted the competition to go into the scrapper’s compacter.

By the way, as I recall, these vehicles were always referred to with the term “jeep” and sometimes MUTT.

According to Scalemates.com, this kit was new tool on 1982, and it shows its age.   This version lets you built a U.S. Army Military Police or U.S.M.C. vehicle with fording kit, both with markings for Vietnam units.

While not called out for use on this version, there are parts for an M60 machine gun and a radio on the sprues, so I decided to use them.  The MP’s spent a lot of time guarding convoys, etc. and seeing the M60’s mounted on their vehicles was pretty common, as was radios being mounted on a huge proportion of the MUTTs.

The kit goes together very well with no issues.  There is a figure for a seated driver, so there are no pedals to get in the way of mounting him.

Pros

Nice quick build as a change of pace project.

Very desirable subject.

Cons

Nothing worth noting.


As I write this blog entry, here in the USA we are in the depths of the corona virus pandemic.  This is a small blog with a few followers, many of whom are from France, Russia and other places around the world that have also been deeply effected by the virus.  My thoughts are with my fellow modelers and their families all over the world, and my hope and wish that we all come through this as unscathed as possible.


 And, as always, thank you for visiting my blog.  Comments are always welcome.