This year I managed to complete ten (10) models. I am sure that is a record. (It is not that I spend all my time at the work bench. I am active in acting as an arbitrator, state bar association committees, competitive shooting, photography here in the beautiful Southwest as well as travel.)
Next year I think I will start off with some more aircraft, which is my greater interest.
Sometimes I wonder why I continue to write this blog. I do not have that many readers. Recently I looked at the statistics for this blog, and I was surprised to see that almost half of the page views are from the Russian Federation and not a few from India and other countries.
Way back in 1990 and 1991, I had the opportunity to visit Russia, which was still the USSR and St. Petersburg was still Leningrad. Things were changing rapidly. Of course, as someone who grew up during the Cold War, I had very mixed views of the then-USSR and what I might find there, but I was very surprised. I found very friendly and kind people. They spoiled their kids, but not in a bad way. Just very indulgent parents. They were genuinely interested in meeting an American, just as we were in meeting them. We seemed to have so much in common. We were all hopeful. Maybe we can find our way back to those hopeful days.
Anyway, I was asking my hosts about many things including scale modeling. They said that sometimes some items were available in the stores, and one day I was presented with two old Frog kits in poly bags with no decals or instructions - just the sprues. That was all that was available then. From what I see from Russian modelers on the Internet today, that has changed a great deal. They are producing some incredible models.
So, the fact that a few folks from around the world are looking at what I am posting, I think I shall keep it up.
I wish everyone a Merry Christmas, Happy Hanukah, etc., and whatever you celebrate at this time of year, a happy time with your families. And to everyone, a Happy and Prosperous New Year.
Saturday, December 17, 2016
Saturday, December 10, 2016
Tamiya German King Tiger with Production Turret, 1/35 Scale, Kit No. 35164
Armed with a derivative of the feared 88mm anti-aircraft gun, it must have been a sobering sight on the battlefield. However, these machines were too complex and too prone to break down. This is a result of the German procurement system, which was dominated by Hitler himself often making bizarre production decisions. (Witness his disastrous decision on the first jet fighter - the Me 262 - demanding it be configured as a bomber.)
Wikipedia has an informative article under the title "Tiger II". Also, in the January 2017 issue of Model Military International is an excellent walk around "Tiger II Close Up". I believe the Tiger II and the King Tiger are one in the same, but I am no student of the various combinations and permutations of Nazi armor. If I am wrong, maybe someone will enlighten me.
The model is a typically excellent Tamiya kit. They are such a pleasure to build. It is like assembling a jigsaw puzzle. And, you can get into the painting and weathering much more quickly. You will not be wasting time removing bits of flash and/or modifying parts to get them to fit. Nor will you have instructions that puzzle rather than guide you.
Early in the build, I decided to replace the vinyl tracks supplied with the kit. I selected the Tamiya Separate Track Link set for this model. They were easy to put together and paint/weather. This was my first use of separate links, and I think I will be using them often in the future.
After I went to that trouble, why put the fenders on the model and cover most of it up? This is only my 4th armor model this century, and I was impatient to find out if a separate link track would be superior to the usual vinyl track. And I found out it is. If you look under the fenders, you would see the track dips down on the road wheels just like the prototype and looks quite realistic. The Tamiya links are of course plastic and I bonded them with Tamiya Extra Thin cement, which is my favorite adhesive for most work.
The scheme I selected was the so-called “ambush” scheme. The dots of paint were simply hand-painted on after I was done airbrushing the other three colors. German military equipment in the war received many different types of camouflage often using three or more colors. I really wonder how successful these schemes were compared to the plain olive drab of the U. S. Army.
The colors I used were Vallejo Model Air Dark Yellow (71.025), Vallejo Model Air Armor Brown (71.041), and Vallejo Model Air Camouflage Dark Green (71.019). I used various washes I mixed from acrylic paints using rust and black paint from Model Master. The tracks and road wheels were weathered with these washes, as well as Vallejo Model Wash European Dust (76.523).
The model represents a King Tiger that was involved with the Battle of the Bulge.
Thank you for looking and feel free to post a comment.


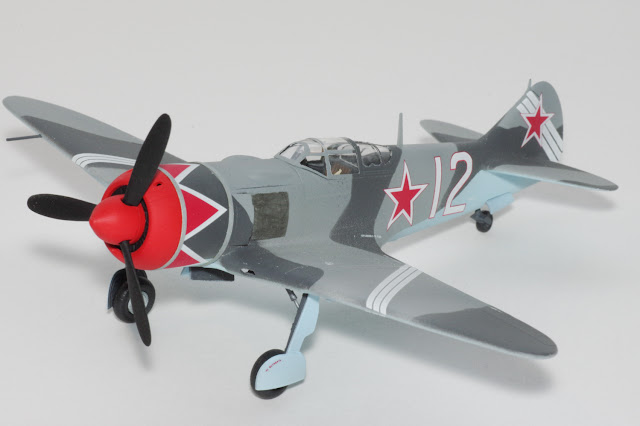
Eduard La-7 Weekend Edition
This kit first came out in 2004. Full information about it is here on www.scalemates.com.
I have always had an interest in the Great Patriotic War Against Fascism, as the Russians called the Second World War. I visited Russia twice in 1990 and again in 1991, just as the USSR was being swept away. It seems all the small towns and cities had museums and memorials dedicated to preserving their struggle against Nazi Germany. I was able to see a number of the aircraft produced by them during the war, and I was amazed at how crude much of the construction was. However, one must consider that the means of production had to be moved east of the Ural Mountains and often operated in open spaces, even during the terrible Russian winters.
We have too take these incredible hardships into account when considering what quality of paint was being produced. Or, whether paint was being applied at all. There are stories of how tanks left the factory in Leningrad during the siege with no paint as they rolled to the front lines which were only a few miles away.
In discussions of modeling USSR aircraft of this period, one reads on forums endless arguments about what colors they were painted. Considering the conditions under which they were manufactured and the conditions under which paints and everything else was being made during the war, how can anyone tell with great specificity what the colors looked like? I doubt the paint factory commissar was flirting with the firing squad by slowing things down arguing over the shade of green paint being applied to a T-34 or Stormovik.
Therefore, after much rummaging about on the Internet, I settled for certain Vallejo colors I thought would fit the bill. A photo of the bottle labels for those colors appears below.
The Lavochkin La-7 proved to be a solid air superiority fighter for the USSR. A very good article detailing its history appears here in Wikipedia.
I am a sucker for Eduard kits, and this one appealed to me and ended up in my stash. Although the molds are only 12 years old, they are somewhat crude and sparse in detail when compared with Eduard’s current 1/72 scale offerings. However, the model is quite workable and not at all hard to build.
All in all it was fun little build.
For some reason, most USSR radial engine fighters of the period have two bright metal bands around the cowl. Masking the stripes or bands in 1/72 scale is more than I think I could have done neatly. So, I instead painted some Tamiya masking tape Vallejo Silver and carefully cut thin strips that I wrapped around the cowl. They might be a tad wide, but I think they look good.
Thank you for looking and I hope you enjoy seeing this model. It is a nice addition to my 1/72 collection.
 |
| Vallejo Colors Used on this Model |


Saturday, October 8, 2016
Tamiya M4A3E8 Sherman “Easy Eight” European Theater 1/35 Scale

This is a fairly new kit, and therefore is state-of-the-art. The part fit is near perfect, the moldings are all crisp and clean, and there is no discernible flash to deal with. The treads are so-called rubber band. The molding pin ejector marks are out of sight. It is a joy to build. (I did use some weathering but did not add any after-market parts, as it looks fine just the way it is.)
I finished it with Vallejo Surface Primer and Vallejo Model Air Olive Drab. The “Air” does not refer to aircraft. It means that the paint is intended for airbrush use. The Vallejo Model Color paints are for brushing. Both types can be brushed on with good results, and both types can be airbrushed. I just find that Model Color paints require more thinner. I get good results with Vallejo’s own airbrush thinner.
The model has the markings of a 4th Armored Division Sherman at Bastogne in January 1945. The turret stars are blacked out to aid in concealment, I assume. As you can see, there are nothing more than the stars. No unit or vehicle number markings are provided. Who knows? Maybe they had been painted over for some reason. I cannot imagine that during the Battle of the Bulge anyone was running around looking for unit numbers.
One other point. I paint U. S. pioneer tools the same color as the vehicle, i.e., olive drab. During my 3 years in the U. S. Army, including a year with the 1st Armored Division, all I ever saw were these tools painted o.d. I am assuming that was the practice during WWII.
I really liked this kit, as assembling it went so smoothly. It is highly recommended to anyone interested in WWII armor.


Monday, September 12, 2016
Supermarine Spitfire Mk Vb, Tamiya Kit No. 33 in 1/48th Scale
This kit has been in my stash since the 1990’s along with Aeromaster Decal Sheet 48-363 — The Eagle Squadron, Pt. 1 - purchased about the same time. That of course means the decal sheet in the kit and the Aeromaster sheet are old enough to vote!
Unfortunately - or fortunately depending on how you look at it - I have a fair number of decals still in kits as well as aftermarket decals that are getting old enough to be of doubtful quality. That means I must test each sheet I am going to use by picking a decal I am not going to use on a model, dipping it in water, and applying it to a “paint dummy” model. My “paint dummies” are models I was not going to build for display for whatever reason. I have assembled the major parts, and I use them to try new paints and paint schemes, and I use them to apply decals to see if they are still viable. After I am done, they are sprayed again with Vallejo Surface Primer and await their next “mission”.
Before I proceeded too far with this Spitfire, I selected a few decals from the Aeromaster sheet I was not going to use, and I applied them. Luckily, they worked as one would hope. So, construction went ahead as planned.

I selected a machine from 121 Squadron. Here is a photo of three 121 Squadron machines landing after a raid over occupied France. The story of the Eagle Squadrons makes you proud to be an American. Wikipedia has an excellent article on the Eagle Squadrons, which is where I found this photo.
Construction was uneventful. The parts fit well, and the kit was engineered for ease of assembly. No surprises and nothing to complain about.
I’ll mention four products used in the build:
1. All the paints are Vallejo Surface Primer and Vallejo Model Air top coat colors.
2. The antenna wire is from Fly Line. It is a light, elastic thread. I glue the thread with Testors clear parts glue. Fly Line is my first choice in 1/48th scale.
3. The seat is an Ultracast Spitfire Seat with Seat Belts molded in. These seats are excellent and make any cockpit look better. The Tamiya seat was fine, but there were no seat belts except, I think, decal seat belts, which were okay in the 1990’s, but not today.
4. Lastly, I masked the camouflage scheme with Silly Putty. I looked in several toy stores for the stuff, but nobody carried it. Thank goodness for Amazon Prime. They had it and sent me a large supply for $6.00. Using this as masking material gives you a hard demarcation line but no “ridge” like you get with masking tape. And, it is far easier to use. It hugs all details and is easy to remove. When done, just ball it up and put it back in the plastic egg for use next time.
Here are a number of photographs of the finished model. It is not a contest winner, but none of my models are. They are built for me to enjoy. They are not built to impress some contest judge with a magnifying glass and and a mini flashlight.


This is a nice relaxed and fairly quick build for modelers of all skill levels. It has my unqualified recommendation. Thank you for looking.
Unfortunately - or fortunately depending on how you look at it - I have a fair number of decals still in kits as well as aftermarket decals that are getting old enough to be of doubtful quality. That means I must test each sheet I am going to use by picking a decal I am not going to use on a model, dipping it in water, and applying it to a “paint dummy” model. My “paint dummies” are models I was not going to build for display for whatever reason. I have assembled the major parts, and I use them to try new paints and paint schemes, and I use them to apply decals to see if they are still viable. After I am done, they are sprayed again with Vallejo Surface Primer and await their next “mission”.
Before I proceeded too far with this Spitfire, I selected a few decals from the Aeromaster sheet I was not going to use, and I applied them. Luckily, they worked as one would hope. So, construction went ahead as planned.
I selected a machine from 121 Squadron. Here is a photo of three 121 Squadron machines landing after a raid over occupied France. The story of the Eagle Squadrons makes you proud to be an American. Wikipedia has an excellent article on the Eagle Squadrons, which is where I found this photo.
Construction was uneventful. The parts fit well, and the kit was engineered for ease of assembly. No surprises and nothing to complain about.
I’ll mention four products used in the build:
1. All the paints are Vallejo Surface Primer and Vallejo Model Air top coat colors.
2. The antenna wire is from Fly Line. It is a light, elastic thread. I glue the thread with Testors clear parts glue. Fly Line is my first choice in 1/48th scale.
3. The seat is an Ultracast Spitfire Seat with Seat Belts molded in. These seats are excellent and make any cockpit look better. The Tamiya seat was fine, but there were no seat belts except, I think, decal seat belts, which were okay in the 1990’s, but not today.
4. Lastly, I masked the camouflage scheme with Silly Putty. I looked in several toy stores for the stuff, but nobody carried it. Thank goodness for Amazon Prime. They had it and sent me a large supply for $6.00. Using this as masking material gives you a hard demarcation line but no “ridge” like you get with masking tape. And, it is far easier to use. It hugs all details and is easy to remove. When done, just ball it up and put it back in the plastic egg for use next time.
Here are a number of photographs of the finished model. It is not a contest winner, but none of my models are. They are built for me to enjoy. They are not built to impress some contest judge with a magnifying glass and and a mini flashlight.


This is a nice relaxed and fairly quick build for modelers of all skill levels. It has my unqualified recommendation. Thank you for looking.
Sunday, September 11, 2016
Tamiya M4A3E8 Sherman "Easy Eight" in 1/35th Sacle
When the armor modelers rave about Tamiya kits (as do aircraft modelers), they are not wrong. The detail and the engineering cannot be beat. It is such a pleasure to spend one's time finishing and detailing a model and not fighting parts that don't fit or spending hours and dollars fitting after market items that should have been there in the first place.

Back in the 1980's and 90's, I built a number of Tamiya armor models, and I thought they were pretty good back then. And they were for the time. Some kits dated back to the 1970's and you could see how they were originally made to accommodate small electric motor drive systems. But they were nice kits for the time.
However, they do not compare with this Easy Eight kit that came out last year. The modern Tamiya armor kits are really superb.
The model is now fully assembled and ready for final painting. (With US armor, you can have any color as long as it is olive drab.) On this one, I am going to attempt some weathering and will add some after market details.

When I am finished, I will post some photos.
Accurate Miniatures SBD-3 Douglas Dauntless Pt 2
A few months ago, I posted about this model. I finished it a month later, but I am just getting around to posting now.
It turned out rather well in my opinion. Accurate Miniatures attempted to put on the market the most detailed kits of the subject in 1/48th scale. It is too bad that they were only in business a few years, but in those few years they left us some really superb kits.

I chose the markings that came with the kit. The machine depicted is an SBD-3 for VB-6 on the carrier Yorktown during the Battle of Midway. If you go to Wikipedia and look up the Dauntless, there is a photo of this aircraft having landed back on Yorktown with battle damage.

The paint is Vallejo Model Air which is my favorite. I prime everything with surface primer before I put on the color coats. This model was primed with black and the color coats applied “thinly” giving it a subtle mottled effect. That is the extent of the weathering. The real aircraft was fairly well faded at the time of the Battle of Midway, but I chose not to try to duplicate that.

The dive brake flaps have the holes in them already. I understand that Hasegawa 1/48th Dauntless does not. It is one of the kew features of the aircraft. They are depicted as they would be deployed for landing.

The kits comes with both single and twin .30 caliber machine guns for the observer/radio operator. It is unclear from what I have read whether this aircraft had the twin mount or not. They were added to the -3 models in the field by and large. The aforementioned photo of this aircraft was taken with the aft gun/s stowed, so I don’t know. Therefore, I opted for a single gun.

Since the aft canopies were frequently dispensed with, I do also.
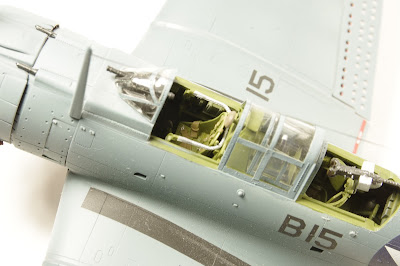
I am a big fan of Ultracast seats. They are beautifully cast, and they include the seat belt harnesses. That silver “U” shaped object in the front cockpit is the wire cable harness used to suspend the Dauntless fro the ceiling of the hangar bay. The Dauntless did not have folding wings, and hanging them up was a good way to store them. It goes to show how much detail Accurate Miniatures put in these kits. Hidden inside the aft cockpit is a detailed set of radios and a second set of flight controls.

The kit includes a 1,000 pound bomb and two 100 pound bombs. The detail of the bomb mounts and landing gear is excellent.
The antenna is fine Easy Line I got from an Ebay merchant. It is elastic thread, and it is very easy to use, much easier than stretched sprue. And, it withstands some mild abuse. I recommend it for 1/48th scale and larger models.
This is the second Accurate Miniatures kit I have constructed. It is such a shame that this company did not survive for very long. The kits they did produce live on is re-issues by Italieri and Eduard. This was a real pleasure to build, and I look forward to digging into my stash and building a few more AM kits.
It turned out rather well in my opinion. Accurate Miniatures attempted to put on the market the most detailed kits of the subject in 1/48th scale. It is too bad that they were only in business a few years, but in those few years they left us some really superb kits.

I chose the markings that came with the kit. The machine depicted is an SBD-3 for VB-6 on the carrier Yorktown during the Battle of Midway. If you go to Wikipedia and look up the Dauntless, there is a photo of this aircraft having landed back on Yorktown with battle damage.

The paint is Vallejo Model Air which is my favorite. I prime everything with surface primer before I put on the color coats. This model was primed with black and the color coats applied “thinly” giving it a subtle mottled effect. That is the extent of the weathering. The real aircraft was fairly well faded at the time of the Battle of Midway, but I chose not to try to duplicate that.

The dive brake flaps have the holes in them already. I understand that Hasegawa 1/48th Dauntless does not. It is one of the kew features of the aircraft. They are depicted as they would be deployed for landing.

The kits comes with both single and twin .30 caliber machine guns for the observer/radio operator. It is unclear from what I have read whether this aircraft had the twin mount or not. They were added to the -3 models in the field by and large. The aforementioned photo of this aircraft was taken with the aft gun/s stowed, so I don’t know. Therefore, I opted for a single gun.

Since the aft canopies were frequently dispensed with, I do also.

I am a big fan of Ultracast seats. They are beautifully cast, and they include the seat belt harnesses. That silver “U” shaped object in the front cockpit is the wire cable harness used to suspend the Dauntless fro the ceiling of the hangar bay. The Dauntless did not have folding wings, and hanging them up was a good way to store them. It goes to show how much detail Accurate Miniatures put in these kits. Hidden inside the aft cockpit is a detailed set of radios and a second set of flight controls.

The kit includes a 1,000 pound bomb and two 100 pound bombs. The detail of the bomb mounts and landing gear is excellent.
The antenna is fine Easy Line I got from an Ebay merchant. It is elastic thread, and it is very easy to use, much easier than stretched sprue. And, it withstands some mild abuse. I recommend it for 1/48th scale and larger models.
*****
This is the second Accurate Miniatures kit I have constructed. It is such a shame that this company did not survive for very long. The kits they did produce live on is re-issues by Italieri and Eduard. This was a real pleasure to build, and I look forward to digging into my stash and building a few more AM kits.
Tuesday, August 9, 2016
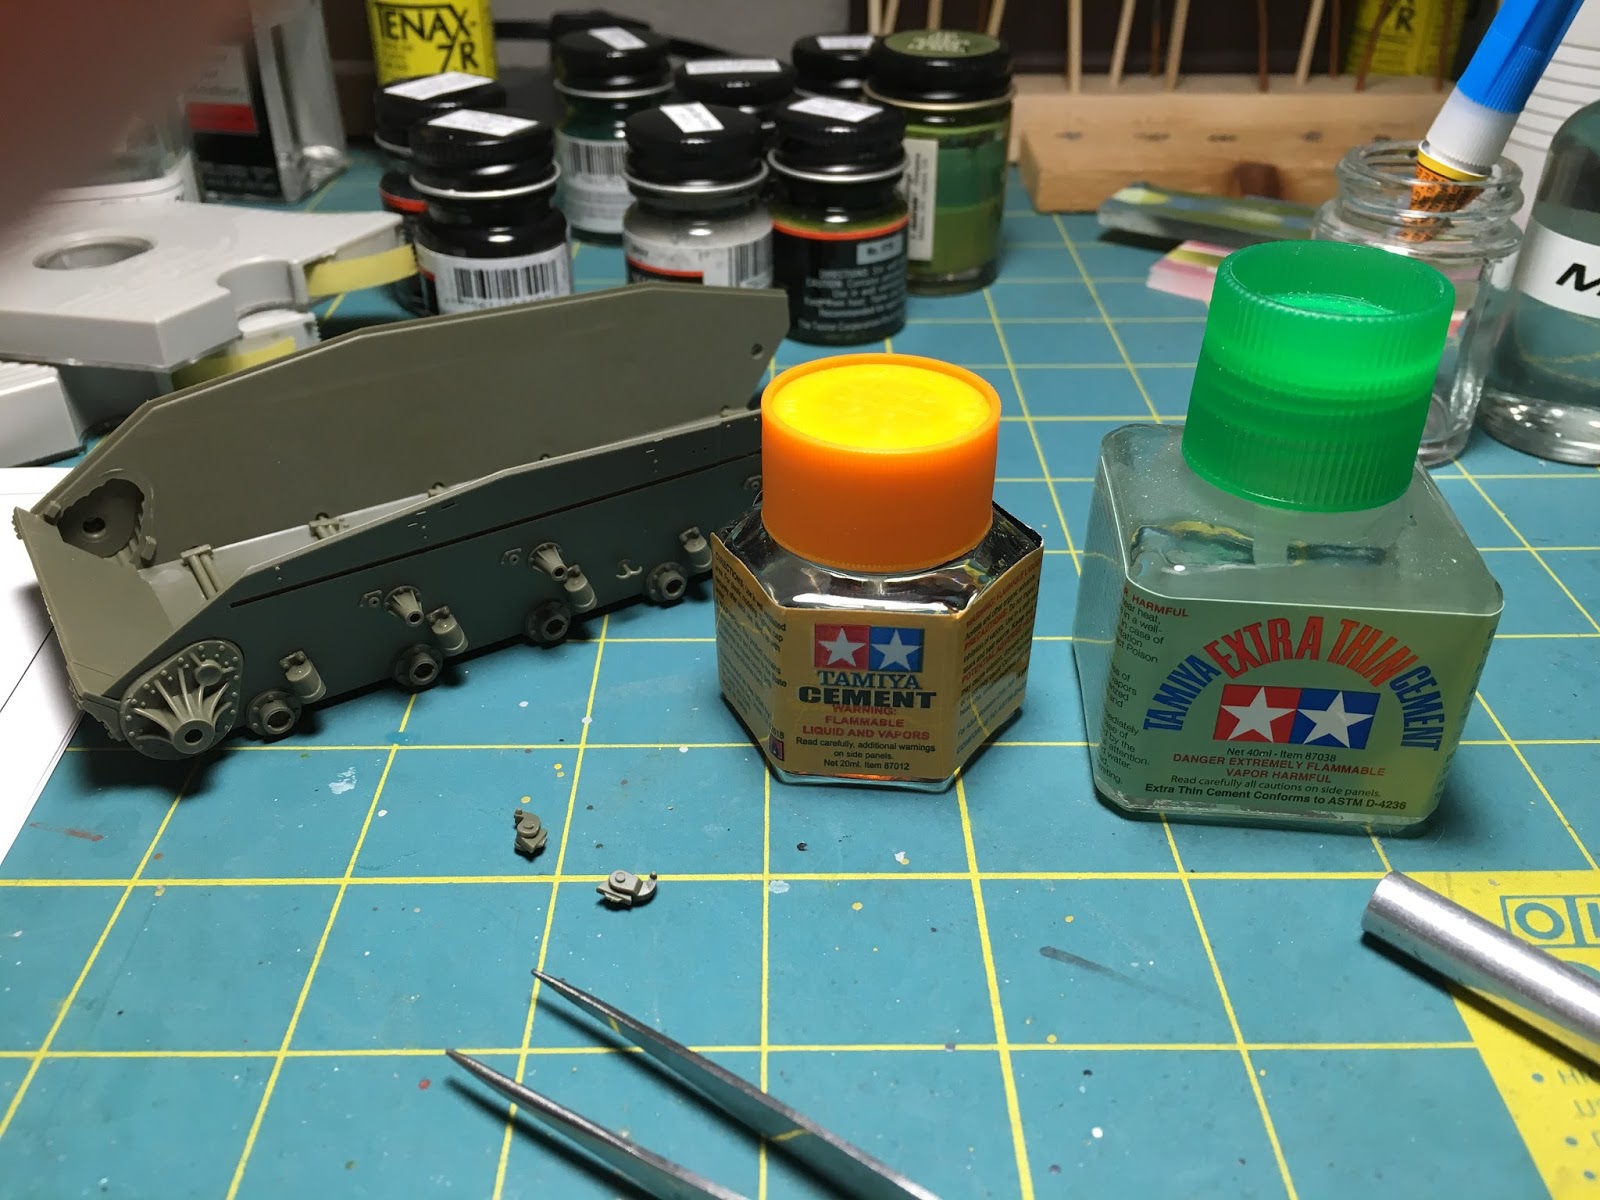
Tamiya Cement - Extra Thin and Regular
These products were being used by Andy at the Andy’s Hobby Headquarters channel on YouTube. If you have not seen his videos, check them out. I have linked his channel here. It is mostly armor. The videos are very professionally produced, and there is something to learn from each one.

Being curious about these cements, I picked some up. Tamiya products always seem to be first-rate, and I use cement all the time. I am currently using MEK as I did years ago. And, it work well bonding. It does have a tendency to really creep further than you think it will. That makes it perfect for parts with long seams to seal like wing halves. But it leaves something to be desired with small parts. I apply it with a drafting pen. If I need something thicker, I tend to use little tubes of thick CA that you can buy anywhere. CA works great, but it is sometimes messy, will cloud clear parts and it really thickens up after the tube has been open for a week or two.
I have mentioned that I am getting back to building some armor. My latest projects an AFV Club M24 Chaffee light tank. There are about a million parts to be glued. Many of them are very tiny. Armor kits are generally fully assembled before any painting is done, so you spend a long time removing parts from the sprues, doing whatever cleanup is needed and then gluing them.
I decided to use these glues, and I could not be happier. The thin cement (green cap) spreads itself along the mating surfaces with capillary action and does it in a well-controlled fashion. The thicker cement (orange cap) cap be applied in tiny dabs where needed, and it does not evaporate so quickly that you do not have time to place the part where it belongs.
These cements are making the assembly of this model tank much, much easier. I have a feeling they will be permanent additions to my workbench.
Monday, August 8, 2016
Tamiya 1/72d scale Zero - A Nearly Perfect Kit
This is the A6M3 Type 22 Zeke, Kit No. 85 in the Tamiya WWII aircraft series.
And it is as nearly a perfect kit as you will find. The fit of the parts is right on. I did not have to apply any putty anywhere. The details are quite something in this small scale. If it was scaled up to 1/48th scale, it would still be a great kit.
I have not made a Japanese aircraft in quite some years, and I was looking for a small, quick project. This was in the stash, and I had all the colors I needed on hand. So, out it came.
An Eduard canopy mask set was on hand also. Those sets are worth the cost. It obviates one of the un-fun chores with a model like this with so many windows and in 72nd scale too.
I added some surgical tape seatbelts, which look okay in this scale. The kit decals went on perfectly using the Microscale system.
I have not added an antenna nor have I weathered it. That will come soon. I have just put together a homemade setup for photographing models, and I wanted to test it out. The Zeke was done enough to put something up about it. I still have a Tamiya Spitfire Vb, and Accurate Miniatures SBD-3 Dauntless and an Eduard Yak-3 that I have completed in the past few months. I will be posting photos of them soon now that I have a better setup for taking photos.
Thank you for looking.


Subscribe to:
Posts (Atom)