Monday, September 12, 2016

Supermarine Spitfire Mk Vb, Tamiya Kit No. 33 in 1/48th Scale

This kit has been in my stash since the 1990’s along with Aeromaster Decal Sheet 48-363 — The Eagle Squadron, Pt. 1 - purchased about the same time.  That of course means the decal sheet in the kit and the Aeromaster sheet are old enough to vote!

Unfortunately - or fortunately depending on how you look at it - I have a fair number of decals still in kits as well as aftermarket decals that are getting old enough to be of doubtful quality. That means I must test each sheet I am going to use by picking a decal I am not going to use on a model, dipping it in water, and applying it to a “paint dummy” model.  My “paint dummies” are models I was not going to build for display for whatever reason.  I have assembled the major parts, and I use them to try new paints and paint schemes, and I use them to apply decals to see if they are still viable.  After I am done, they are sprayed again with Vallejo Surface Primer and await their next “mission”.

Before I proceeded too far with this Spitfire, I selected  a few decals from the Aeromaster sheet I was not going to use, and I applied them.  Luckily, they worked as one would hope.  So, construction went ahead as planned.


https://upload.wikimedia.org/wikipedia/commons/thumb/3/33/Personnel_of_No.121_%28Eagle%29_Squadron_look_on_as_three_Spitfire_Vbs_come_in_to_land_at_RAF_Rochford_in_Essex%2C_after_a_fighter_sweep_over_northern_France_during_August_1942._D9509.jpg/640px-thumbnail.jpg 

I selected a machine from 121 Squadron.  Here is a photo of three 121 Squadron machines landing after a raid over occupied France.  The story of the Eagle Squadrons makes you proud to be an American.  Wikipedia has an excellent article on the Eagle Squadrons, which is where I found this photo.


Construction was uneventful.  The parts fit well, and the kit was engineered for ease of assembly.  No surprises and nothing to complain about.

I’ll mention four products used in the build:

1.  All the paints are Vallejo Surface Primer and Vallejo Model Air top coat colors.

2.  The antenna wire is from Fly Line.  It is a light, elastic thread.  I glue the thread with Testors clear parts glue.  Fly Line is my first choice in 1/48th scale.

3.  The seat is an Ultracast Spitfire Seat with Seat Belts molded in.  These seats are excellent and make any cockpit look better.  The Tamiya seat was fine, but there were no seat belts except, I think, decal seat belts, which were okay in the 1990’s, but not today.

4.  Lastly, I masked the camouflage scheme with Silly Putty.  I looked in several toy stores for the stuff, but nobody carried it.  Thank goodness for Amazon Prime.  They had it and sent me a large supply for $6.00.  Using this as masking material gives you a hard demarcation line but no “ridge” like you get with masking tape.  And, it is far easier to use.  It hugs all details and is easy to remove.  When done, just ball it up and put it back in the plastic egg for use next time.

Here are a number of photographs of the finished model.  It is not a contest winner, but none of my models are.  They are built for me to enjoy.  They are not built to impress some contest judge with a magnifying glass and and a mini flashlight.  


This is a nice relaxed and fairly quick build for modelers of all skill levels.  It has my unqualified recommendation.  Thank you for looking.


Sunday, September 11, 2016

Tamiya M4A3E8 Sherman "Easy Eight" in 1/35th Sacle

When the armor modelers rave about Tamiya kits (as do aircraft modelers), they are not wrong.  The detail and the engineering cannot be beat.  It is such a pleasure to spend one's time finishing and detailing a model and not fighting parts that don't fit or spending hours and dollars fitting after market items that should have been there in the first place.


Back in the 1980's and 90's, I built a number of Tamiya armor models, and I thought they were pretty good back then.  And they were for the time.  Some kits dated back to the 1970's and you could see how they were originally made to accommodate small electric motor drive systems.  But they were nice kits for the time.

However, they do not compare with this Easy Eight kit that came out last year.  The modern Tamiya armor kits are really superb.

The model is now fully assembled and ready for final painting.  (With US armor, you can have any color as long as it is olive drab.)  On this one, I am going to attempt some weathering and will add some after market details.


When I am finished, I will post some photos. 

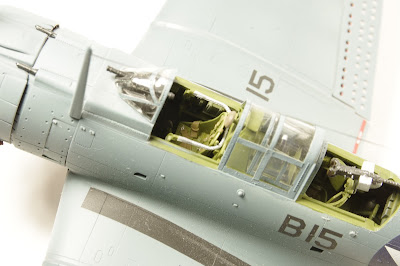
Accurate Miniatures SBD-3 Douglas Dauntless Pt 2

 A few months ago, I posted about this model.  I finished it a month later, but I am just getting around to posting now.

It turned out rather well in my opinion.  Accurate Miniatures attempted to put on the market the most detailed kits of the subject in 1/48th scale.  It is too bad that they were only in business a few years, but in those few years they left us some really superb kits.


I chose the markings that came with the kit.  The machine depicted is an SBD-3 for VB-6 on the carrier Yorktown during the Battle of Midway.  If you go to Wikipedia and look up the Dauntless, there is a photo of this aircraft having landed back on Yorktown with battle damage. 


The paint is Vallejo Model Air which is my favorite.  I prime everything with surface primer before I put on the color coats.  This model was primed  with black and the color coats applied “thinly” giving it a subtle mottled effect.  That is the extent of the weathering.  The real aircraft was fairly well faded at the time of the Battle of Midway, but I chose not to try to duplicate that.


The dive brake flaps have the holes in them already.  I understand that Hasegawa 1/48th Dauntless does not.  It is one of the kew features of the aircraft.  They are depicted as they would be deployed for landing.


The kits comes with both single and twin .30 caliber machine guns for the observer/radio operator.  It is unclear from what I have read whether this aircraft had the twin mount or not.  They were added to the -3 models in the field by and large.  The aforementioned photo of this aircraft was taken with the aft gun/s stowed, so I don’t know.  Therefore, I opted for a single gun.


Since the aft canopies were frequently dispensed with, I do also.


I am a big fan of Ultracast seats.  They are beautifully cast, and they include the seat belt harnesses.  That silver “U” shaped object in the front cockpit is the wire cable harness used to suspend the Dauntless fro the ceiling of the hangar bay.  The Dauntless did not have folding wings, and hanging them up was a good way to store them.  It goes to show how much detail Accurate Miniatures put in these kits.  Hidden inside the aft cockpit is a detailed set of radios and a second set of flight controls.


The kit includes a 1,000 pound bomb and two 100 pound bombs.  The detail of the bomb mounts and landing gear is excellent.

The antenna is fine Easy Line I got from an Ebay merchant.  It is elastic thread, and it is very easy to use, much easier than stretched sprue.   And, it withstands some mild abuse.  I recommend it for 1/48th scale and larger models.


*****


This is the second Accurate Miniatures kit I have constructed.  It is such a shame that this company did not survive for very long.  The kits they did produce live on is re-issues by Italieri and Eduard.  This was a real pleasure to build, and I look forward to digging into my stash and building a few more AM kits.