Saturday, January 18, 2020

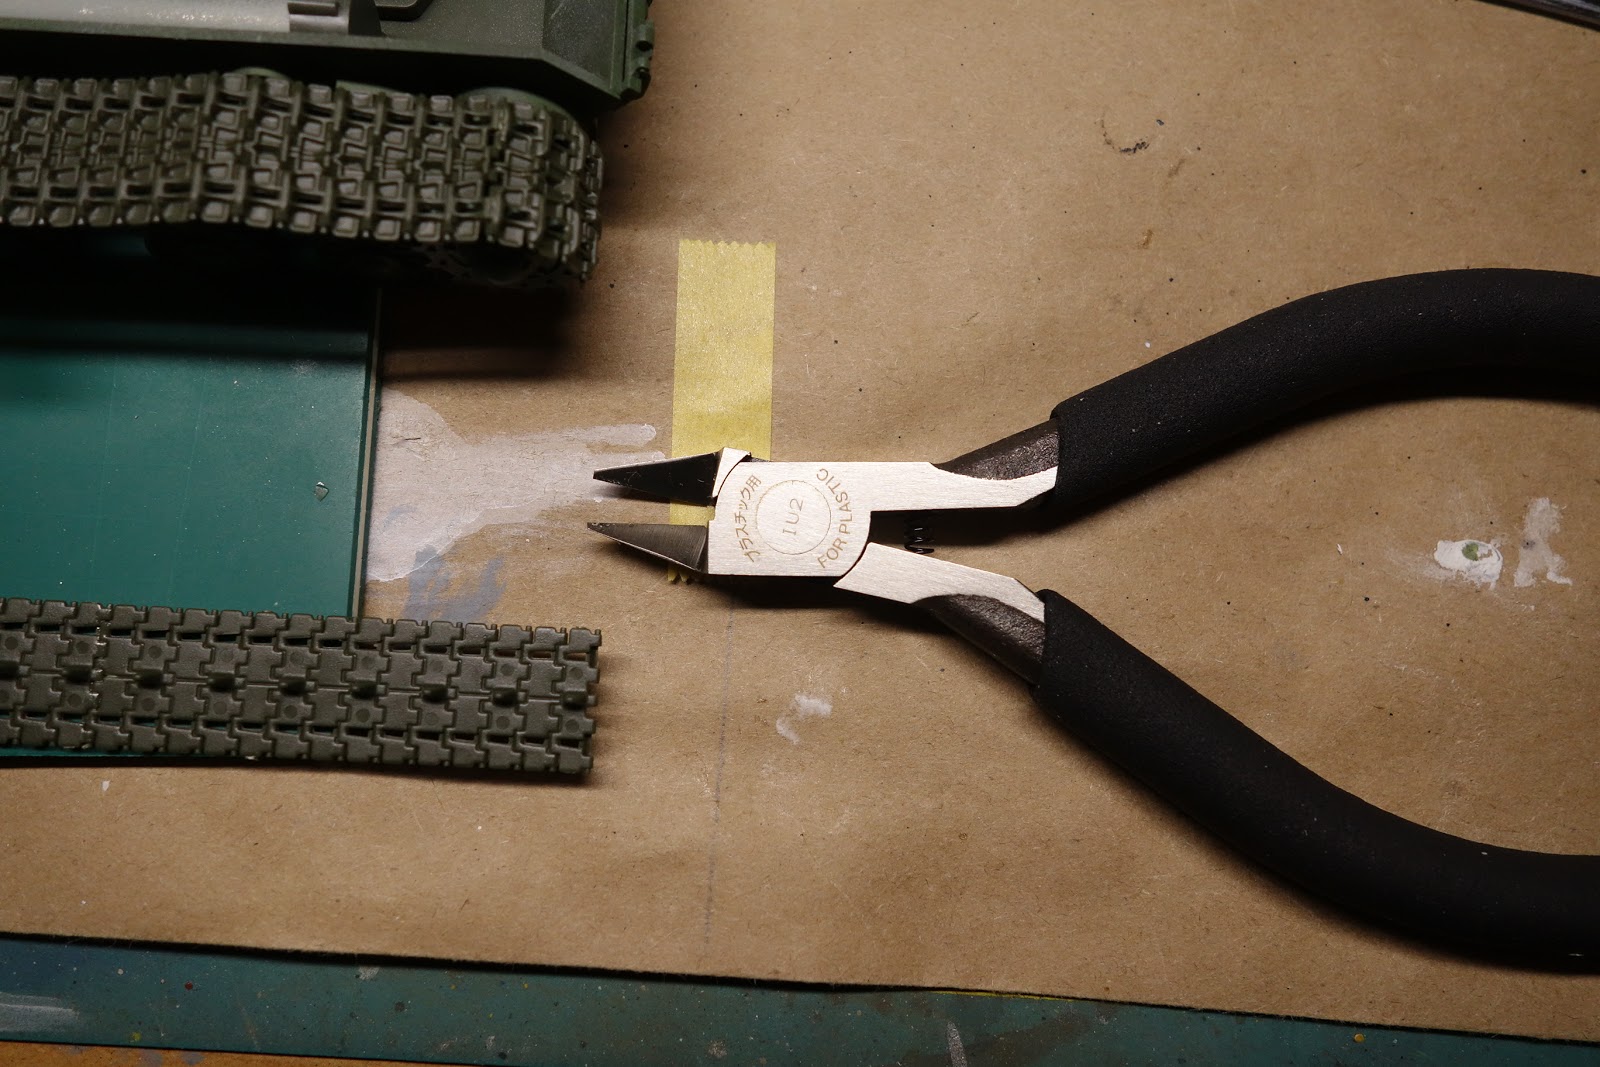
Tamiya Craft Tools 74123 Sharp Pointed Side Cutter For Plastic (Slim Jaw)

Occasionally I run into some new tool or other item that helps my model building, and I like to pass the information along.

This is such an item.

I found these on eBay for sale by a seller in Japan.  I ordered them for about $25 ppost paid.  They came in a nice little package in less than two weeks.

Right now, a Tamiya JS-2 Russian Heavy Tank in 1/48th scale is on the workbench.  There are a lot of small parts.  As you know, when cutting small parts off the sprues it is easy to deform, break or otherwise damage the part.  It is very easy to leave some of the plastic material behind when nipping the bridge between the part itself and the sprue.

I had none of those issues with this tool.   The cutting jaws are very small allowing you to get into small spaces.  And, the jaws are very, very sharp making for a clean cut with no excess left behind.

I can see these cutters are going to get a lot of use on my workbench.  They have my unqualified endorsement.

The cutters are little over 4" in length and the handles are covered with firm form padding.


Sunday, January 12, 2020

Monogram AT-6 Texan, 1/48 scale, Kit No. 5306


This is a real oldie having been in my stash for decades.  The decals in this kit were marked “3-80” indicating they were printed in March 1980, quite early in this kit’s commercial life.

With this kit, even when the molds were brand new, there were some flash and fit problems, but nothing that bad.  Ejection pin marks were few and mostly out of sight.

And, yes, all the surface detail is raised.  The only complaint I have about raised detail is that it is removed when filling seams and very hard to replace.

Somewhere along the way, I picked up AeroMaster Decals 48-387A “T-6 Texan Collection”.  Being a proud Arizonan, I picked the markings for a T-6 used for aerial gunnery training at Luke Field, now Luke Air Force Base just west of Phoenix and home of the F-35 Lightning II fleet.

Luke Field AT-6 cir. 1941.  Public Domain photo.

Public Domain photo.
 The wing walks are from an old Scale-Master Stripes sheet of decals.  Still good after all these years and as handy as ever.

It was fun to make a model from years gone by.  I enjoyed the project very much and will give the other few Monogram kits I have a second look.

I have a nice Monogram Promodeler A-26B Invader I got off Ebay a few years ago which looks nicely detailed.  (I know the ICM WWII version is due out soon and will probably be a more detailed kit, but the old Monogram models still looks pretty good when done.)

I also have in my stash the Monogram TBD-1 Devastator and some decals for Torpedo Squadron 8 at Midway that deserves to be built.

These old Monogram kits are frequently available at model shows at very low prices, so you might want to keep an eye out for one.

The surface has raised details, of course.  I do not mind the raised panel lines so much, but I hate all those rivets.  If I felt it necessary to completely sand and file the surface flat and re-scribe the details, I would look at a more modern kit and not go to all that trouble.  With a flat military paint scheme, they are much less intrusive, but as we all know metal finishes make everything stand out.

The 1979 Copyright date is clearly visible.  The instructions are not that bad.

The decals are pretty thick, as can be seen.  I only used the 2 prop blade labels.

The detail of these parts is not bad at all.  I skipped the figures.

Nice added sidewall detail can be seen as well as the absence of ejection pin marks.
Nice cockpit detail parts.

Instrument panel detail popped out with some careful painting.
I took this photo at Falcon Field, Mesa.  The .30 cal. wing gun with a short barrel can be seen as well as the cowl gun.  These were for aerial gunnery practice.  The kit's original wing gun was way too long and was cut down.


I painted the anti-glare panel after the silver was applied.  I have learned that you cannot mask enough.

Notice the copyright mark on the exterior of the lower right stabilizer.  I sanded that off.  Kits used to have such markings on the exterior.  I don't know why when the interior was also marked.

There are some fit issues, but there was noting that a little judicious sanding did not resolve.  This is one area where the raised detail is an issue.  With engraved detail, re-scribing is much easier than with raised detail where recreation of panel lines and such is a real challenge.

Colors used:

Vallejo Model Air 71.003 Red
Vallejo Model Air 71.010 Interior Green
Vallejo Model Air 71.043 Olive Drab
Vallejo Model Air 71.051 Barley Grey
Vallejo Model Air 71.057 Black
Vallejo Model Air 71.063 Silver
Vallejo Model Air 71.080 Rust
Vallejo Model Air 71.279 Insignia White
Vallejo Model Color 70.915 Deep Yellow
Vallejo Model Color 70.951 White
Vallejo Metal Color 77.701 Aluminum
Vallejo Surface Primer 73.660 Gloss Black
Tamiya X-7 Gloss Red
Tamiya X-18 Semigloss Black
Tamiya X-25 Clear Green
Tamiya X-26 Clear Orange
Tamiya X-27 Clear Red
Model Master Acryl #4749 Engine Gray

Pros

Very attractive subject.


Nicely detailed cockpit.

An effective simple tab system to allow dropped flaps to be displayed.  Cutting the tabs off allows the flaps to be displayed closed.  That is a feature I would welcome on modern kits.  The tabs make the joint strong enough to withstand moderate handling.  Today, all we ever seem to get is a butt joint with no strength aside from the glue we use.

Part fit was not bad.  A little sanding here and there was required, but nothing major.  The only putty was a small amount on the win g to fuselage joint,

Cons

The raised detail rivals the grip texture on a Gen 4 Glock pistol.  The panel lines would be tolerable alone, but the millions of rivets are too much.  If a flat, dark color scheme is selected by the modeler, these details would stand out less.  However, we all know one of the issues with metallic finishes is that even detail and flaw really stands out.

The pitot tube was molded as part of the upper wing panel.  It did not survive the build, although I was extra careful.  I should have cut it off before I started.  It was broken off and lost during the painting process.  I replaced it with an extra from my spares box.

The clear parts are somewhat thick and therefore there is some distortion.  The frames, however, are very nicely engraved making masking the canopy much easier, so this last observation is both a Pro and a Con.


Displayed on a 1/48 model shelf above a 1/72 model shelf.

As always, thank you for visiting.  Comments are welcome.


Saturday, November 30, 2019

Takom, V-2 German Missile, 1/35th scale, Kit No. 03.01.2075

I made the 1/72nd scale Revell model earlier this year and wrote about it on this blog.

There is no question that the V-2 was an enormous technological achievement by Werner Von Braun. He later worked for NASA and received much of the credit for the Saturn V, his Nazi past and war record using slave labor forgotten.  The design survived for many years, e.g., the Scud missiles off Gulf War fame were basically advanced V-2 missiles.  The V-2 was both the first man made device to travel at supersonic speeds, and it was also the first man made device to leave the Earth and enter near space.

I have read that while the Germans launched over 1,000 of these at the Allied forces in the West and also England itself, they had little or no effect (except of course the direct victims).  And amazingly the Germans still were thinking that these so-called miracle weapons would reverse the situation and save them from the avalanche of military power cascading down on their country from East and West.


Von Braun and fellow Nazis at Peenemunde German Army Research Center. German Federall Archive Photo.

The finished model is 16” tall without the launch stand.  This was a big, powerful missile.  It is no wonder it was the first man-made object to leave the Earth’s atmosphere, and it was the first such object to travel at supersonic speeds.  It was a technological achievement, no doubt about it.

I primed the model with Tamiya gray primer.  Vallejo Model Air paint was used for the camouflage:  Dark Yellow 71.025, Panzer Olive 71.096, Cream White 71.270, and Black Grey 71.055 (for the launch stand).

To duplicate the splinter camouflage pattern, I painted white, green then yellow last.  Normally, one might well pick yellow as the second color to apply, but the masking job to do that would have been very extensive.  That was my approach.

Pros

Very desirable historic subject in a larger scale making an impressive model.

Very nicely detailed plastic parts with restrained surface detail.

Small fret of photo etch parts (8 panel latches).  A nice extra detail.

There are five color schemes to choose from.  Many YouTube videos show the V-2 being launched, and almost all of them are in the black and white test version color scheme.  I have seen a few with the splinter scheme, and many of the captured V-2 rockets are in a dark overall color, probably a dark green.  Who knows at the end of the war?  They were trying to hurl these missiles at the Allies as fast as they could, but apparently to little avail.  There probably was not enough time for fancy camo jobs to be applied.  I painted the launch platform RLM 66 Grey.  It just seemed logical.  The instructions are silent on the subject.

The small sheet of decals were very easy to work with.  They release from the backing paper quickly and respond to Tamiya Markfit Strong Decal Solution.

Cons

The four fins needed some filler, which was easily taken care of with Vallejo Putty.  There is a seam between the two upper halves that I did not fill.  This is because in my research I saw photos of an unassembled V-2 that showed the outer shell splitting into two halves just like these model parts.    For once, the seam is scale accurate.

In a couple of places the printing on the instructions is very small.  It is as if the pages were designed in a larger format than they were printed on.  My regular magnifier hood took care of that.

The plastic was very slippery out of the box.  I assumed it was mold release agent, and I gave the parts a good soak in warm water and Dawn detergent.  The parts felt much different after that, i.e., not slippery at all.  Since so much masking is called for on this model, I wanted to start with a clean and grease free surface.

Basically, there is nothing major to talk about.  The above are really kind of nitpicks. 
I did not join the upper and lower halves until I was done.  It is a big model in a small workspace!

These are the four main colors I used.

As they say, yellow has trouble covering itself.


The large size of the V-2 is demonstrated here posed next to an M4E8 Sherman, also in 1/35 scale.

Wednesday, November 20, 2019

Eduard P-400 Airacobra, 1/48th scale, Kit No. 8061 ProfiPak

Kit box top

Photos of the Air-A-Cutie in 1943.  Public Domain.
Rarely do I make a kit a second time.  This is an exception.  My first Eduard Airacobra, a P-400, appears in my blog post of May 15, 2015. 

This particular kit has languished in my stash since around 2001.  It was the first Eduard kit I purchased, but it never made its was to the building bench.

A few weeks ago I was reading some material on the WWII nose art, and I ran across photos of this particular P-39F (P-400 being the designation of a bunch of P-39 aircraft made for the British but were retained by the USA). 

In my decal collection, I had markings for the “Air-A-Cutie”, perhaps the most risqué nose art of the war.  This was Cutting Edge decals for various P-39 and P-400 Airacobra's, sheet number CED 48035.  This aircraft was a P-39F of the 36th Fighter Squadron, 8th Fighter Group on New Guinea in August 1943.

Not wanting these decals to go unused, I dug out this old kit and went to work on it.

It goes together very well.  I had used the pre-cast nose weight from this kit in the previously mentioned P-400 I had made.  Not to worry, as I had a good supply of #8 lead bird shot I use for making nose weights when needed.  This size shot is small and can be fit into even small spaces.  On this model I filled the area in from of the cockpit over the nose wheel bay with the shot.  It was more than ample to keep this model from being a tail sitter.

The airframe was painted with Tamiya acrylics.  I covered the paint with Microscale Satin varnish and applied the decals.  These decals were made before the Eduard kit, as they were more than likely fitted to the very old Monogram P-39.  They fit perfectly, even the white stripe around the nose.

I also applied some decals from Superscale International P-39Q and P-400 Airacobra's decal set.  The wing walks, prop logos and few other decals were used.

After decals, more satin varnish was applied, and the model was detailed with Tamiya Panel Line Accent Color in black and dark brown.  I apply this material with the brush built into the bottle cap.  After it dries, I carefully remove the excess with a 1/4” flat brush dipped in mineral spirits and wiped almost dry.  The exhaust stains are applied with Tamiya Weathering Master chalk.

Contemporary Eduard kits are more detailed than this one, but this kit is more than adequate and makes a nice replica.  There is nothing to not like.


As always, thank you for visiting my blog.  Comments are always welcome.