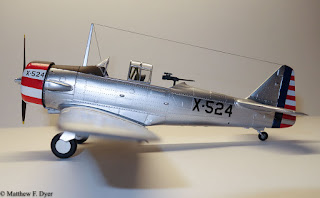
With this kit, even when the molds were brand new, there were some flash and fit problems, but nothing that bad. Ejection pin marks were few and mostly out of sight.
And, yes, all the surface detail is raised. The only complaint I have about raised detail is that it is removed when filling seams and very hard to replace.
Somewhere along the way, I picked up AeroMaster Decals 48-387A “T-6 Texan Collection”. Being a proud Arizonan, I picked the markings for a T-6 used for aerial gunnery training at Luke Field, now Luke Air Force Base just west of Phoenix and home of the F-35 Lightning II fleet.
 |
| Luke Field AT-6 cir. 1941. Public Domain photo. |
 |
| Public Domain photo. |
It was fun to make a model from years gone by. I enjoyed the project very much and will give the other few Monogram kits I have a second look.
I have a nice Monogram Promodeler A-26B Invader I got off Ebay a few years ago which looks nicely detailed. (I know the ICM WWII version is due out soon and will probably be a more detailed kit, but the old Monogram models still looks pretty good when done.)
I also have in my stash the Monogram TBD-1 Devastator and some decals for Torpedo Squadron 8 at Midway that deserves to be built.
These old Monogram kits are frequently available at model shows at very low prices, so you might want to keep an eye out for one.
The surface has raised details, of course. I do not mind the raised panel lines so much, but I hate all those rivets. If I felt it necessary to completely sand and file the surface flat and re-scribe the details, I would look at a more modern kit and not go to all that trouble. With a flat military paint scheme, they are much less intrusive, but as we all know metal finishes make everything stand out.
 |
| The 1979 Copyright date is clearly visible. The instructions are not that bad. |
 |
| The decals are pretty thick, as can be seen. I only used the 2 prop blade labels. |
 |
| The detail of these parts is not bad at all. I skipped the figures. |
 |
| Nice added sidewall detail can be seen as well as the absence of ejection pin marks. |
 |
| Nice cockpit detail parts. |
 |
| Instrument panel detail popped out with some careful painting. |
 | ||
| I painted the anti-glare panel after the silver was applied. I have learned that you cannot mask enough. |
 | ||
| Notice the copyright mark on the exterior of the lower right stabilizer. I sanded that off. Kits used to have such markings on the exterior. I don't know why when the interior was also marked. |
Colors used:
Vallejo Model Air 71.003 Red
Vallejo Model Air 71.010 Interior Green
Vallejo Model Air 71.043 Olive Drab
Vallejo Model Air 71.051 Barley Grey
Vallejo Model Air 71.057 Black
Vallejo Model Air 71.063 Silver
Vallejo Model Air 71.080 Rust
Vallejo Model Air 71.279 Insignia White
Vallejo Model Color 70.915 Deep Yellow
Vallejo Model Color 70.951 White
Vallejo Metal Color 77.701 Aluminum
Vallejo Surface Primer 73.660 Gloss Black
Tamiya X-7 Gloss Red
Tamiya X-18 Semigloss Black
Tamiya X-25 Clear Green
Tamiya X-26 Clear Orange
Tamiya X-27 Clear Red
Model Master Acryl #4749 Engine Gray
Pros
Very attractive subject.Nicely detailed cockpit.
An effective simple tab system to allow dropped flaps to be displayed. Cutting the tabs off allows the flaps to be displayed closed. That is a feature I would welcome on modern kits. The tabs make the joint strong enough to withstand moderate handling. Today, all we ever seem to get is a butt joint with no strength aside from the glue we use.
Part fit was not bad. A little sanding here and there was required, but nothing major. The only putty was a small amount on the win g to fuselage joint,
Cons
The raised detail rivals the grip texture on a Gen 4 Glock pistol. The panel lines would be tolerable alone, but the millions of rivets are too much. If a flat, dark color scheme is selected by the modeler, these details would stand out less. However, we all know one of the issues with metallic finishes is that even detail and flaw really stands out.The pitot tube was molded as part of the upper wing panel. It did not survive the build, although I was extra careful. I should have cut it off before I started. It was broken off and lost during the painting process. I replaced it with an extra from my spares box.
The clear parts are somewhat thick and therefore there is some distortion. The frames, however, are very nicely engraved making masking the canopy much easier, so this last observation is both a Pro and a Con.
 |
| Displayed on a 1/48 model shelf above a 1/72 model shelf. |


No comments:
Post a Comment