Saturday, November 30, 2019

Takom, V-2 German Missile, 1/35th scale, Kit No. 03.01.2075

I made the 1/72nd scale Revell model earlier this year and wrote about it on this blog.

There is no question that the V-2 was an enormous technological achievement by Werner Von Braun. He later worked for NASA and received much of the credit for the Saturn V, his Nazi past and war record using slave labor forgotten.  The design survived for many years, e.g., the Scud missiles off Gulf War fame were basically advanced V-2 missiles.  The V-2 was both the first man made device to travel at supersonic speeds, and it was also the first man made device to leave the Earth and enter near space.

I have read that while the Germans launched over 1,000 of these at the Allied forces in the West and also England itself, they had little or no effect (except of course the direct victims).  And amazingly the Germans still were thinking that these so-called miracle weapons would reverse the situation and save them from the avalanche of military power cascading down on their country from East and West.


Von Braun and fellow Nazis at Peenemunde German Army Research Center. German Federall Archive Photo.

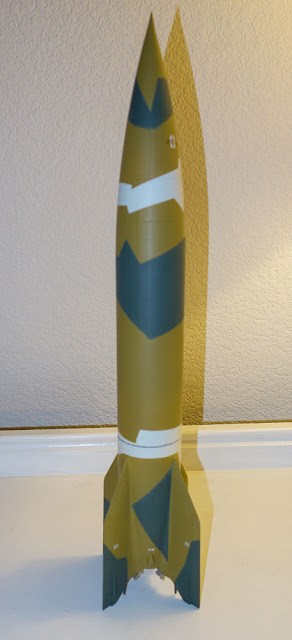
The finished model is 16” tall without the launch stand.  This was a big, powerful missile.  It is no wonder it was the first man-made object to leave the Earth’s atmosphere, and it was the first such object to travel at supersonic speeds.  It was a technological achievement, no doubt about it.

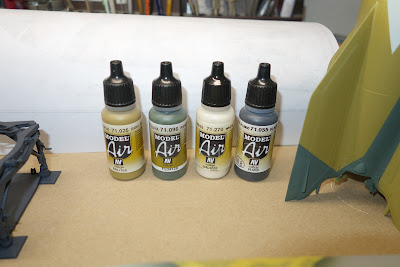
I primed the model with Tamiya gray primer.  Vallejo Model Air paint was used for the camouflage:  Dark Yellow 71.025, Panzer Olive 71.096, Cream White 71.270, and Black Grey 71.055 (for the launch stand).

To duplicate the splinter camouflage pattern, I painted white, green then yellow last.  Normally, one might well pick yellow as the second color to apply, but the masking job to do that would have been very extensive.  That was my approach.

Pros

Very desirable historic subject in a larger scale making an impressive model.

Very nicely detailed plastic parts with restrained surface detail.

Small fret of photo etch parts (8 panel latches).  A nice extra detail.

There are five color schemes to choose from.  Many YouTube videos show the V-2 being launched, and almost all of them are in the black and white test version color scheme.  I have seen a few with the splinter scheme, and many of the captured V-2 rockets are in a dark overall color, probably a dark green.  Who knows at the end of the war?  They were trying to hurl these missiles at the Allies as fast as they could, but apparently to little avail.  There probably was not enough time for fancy camo jobs to be applied.  I painted the launch platform RLM 66 Grey.  It just seemed logical.  The instructions are silent on the subject.

The small sheet of decals were very easy to work with.  They release from the backing paper quickly and respond to Tamiya Markfit Strong Decal Solution.

Cons

The four fins needed some filler, which was easily taken care of with Vallejo Putty.  There is a seam between the two upper halves that I did not fill.  This is because in my research I saw photos of an unassembled V-2 that showed the outer shell splitting into two halves just like these model parts.    For once, the seam is scale accurate.

In a couple of places the printing on the instructions is very small.  It is as if the pages were designed in a larger format than they were printed on.  My regular magnifier hood took care of that.

The plastic was very slippery out of the box.  I assumed it was mold release agent, and I gave the parts a good soak in warm water and Dawn detergent.  The parts felt much different after that, i.e., not slippery at all.  Since so much masking is called for on this model, I wanted to start with a clean and grease free surface.

Basically, there is nothing major to talk about.  The above are really kind of nitpicks. 
I did not join the upper and lower halves until I was done.  It is a big model in a small workspace!

These are the four main colors I used.

As they say, yellow has trouble covering itself.


The large size of the V-2 is demonstrated here posed next to an M4E8 Sherman, also in 1/35 scale.

Wednesday, November 20, 2019

Eduard P-400 Airacobra, 1/48th scale, Kit No. 8061 ProfiPak

Kit box top

Photos of the Air-A-Cutie in 1943.  Public Domain.
Rarely do I make a kit a second time.  This is an exception.  My first Eduard Airacobra, a P-400, appears in my blog post of May 15, 2015. 

This particular kit has languished in my stash since around 2001.  It was the first Eduard kit I purchased, but it never made its was to the building bench.

A few weeks ago I was reading some material on the WWII nose art, and I ran across photos of this particular P-39F (P-400 being the designation of a bunch of P-39 aircraft made for the British but were retained by the USA). 

In my decal collection, I had markings for the “Air-A-Cutie”, perhaps the most risqué nose art of the war.  This was Cutting Edge decals for various P-39 and P-400 Airacobra's, sheet number CED 48035.  This aircraft was a P-39F of the 36th Fighter Squadron, 8th Fighter Group on New Guinea in August 1943.

Not wanting these decals to go unused, I dug out this old kit and went to work on it.

It goes together very well.  I had used the pre-cast nose weight from this kit in the previously mentioned P-400 I had made.  Not to worry, as I had a good supply of #8 lead bird shot I use for making nose weights when needed.  This size shot is small and can be fit into even small spaces.  On this model I filled the area in from of the cockpit over the nose wheel bay with the shot.  It was more than ample to keep this model from being a tail sitter.

The airframe was painted with Tamiya acrylics.  I covered the paint with Microscale Satin varnish and applied the decals.  These decals were made before the Eduard kit, as they were more than likely fitted to the very old Monogram P-39.  They fit perfectly, even the white stripe around the nose.

I also applied some decals from Superscale International P-39Q and P-400 Airacobra's decal set.  The wing walks, prop logos and few other decals were used.

After decals, more satin varnish was applied, and the model was detailed with Tamiya Panel Line Accent Color in black and dark brown.  I apply this material with the brush built into the bottle cap.  After it dries, I carefully remove the excess with a 1/4” flat brush dipped in mineral spirits and wiped almost dry.  The exhaust stains are applied with Tamiya Weathering Master chalk.

Contemporary Eduard kits are more detailed than this one, but this kit is more than adequate and makes a nice replica.  There is nothing to not like.


As always, thank you for visiting my blog.  Comments are always welcome.

Wednesday, November 13, 2019

My Time In Model Building

When I was growing up in the late 50’s and early 60’s, all of my friends built models, generally Revell and Aurora plastic models and some Comet and Top Flite balsa rubber powered models.  Some of us built flying models powered by glow engines, either free flight or U-control.  This was long before practical, inexpensive R/C.

For most of us, cars, girls and rock ’n’ roll came into our lives and model building went away.  I had built some cars in early high school years, and once when I was going to be stuck on weekend CQ duty in the Army, I picked up an AMT 1/25 model of some car at the PX and spent some time that boring weekend building it.  (I have no idea what happened to it.)

Flash forward a decade.  After a tour in Vietnam, college and law school, I was a newly minted Deputy Special Prosecutor in New York City enjoying my first year of freedom from the unimaginable workload and drudgery of law school.  One evening I was in an E.J. Korvette department store in Brooklyn, NY looking for a Christmas gift for my then fiancé (and I thank God in Heaven that 43 years later she is right here still putting up with me). 

I was thinking toaster oven, and I took a shortcut through the toy department to small appliances.  And right there on the shelves were plastic model kits, something I had not looked at in more than a decade.  Standing right out was a stunning picture of a P-40E Warhawk plunging down on apparently unsuspecting Japanese Betty bombers.  Revell always always had stunning box art.

The toaster oven was secured, I went back through the toy/model department and started looking at the kits.  When I saw the Revell 1/32nd scale P-51B in Capt. Donald Gentile’s markings, I plucked it off the shelf. 

And, I was on the slippery slope.

The was way back in 1976.  Monogram was still in business turning out new kits of really interesting subjects, like the B-26 Marauder and the B-25H Mitchell.  Microscale was providing dozens and dozens of decal sheets to replace the (unfortunately) rather crappy ones that came with the kits of the time.  Monogram was great, but their decals were beyond awful.

Microscale also had a two solution system for applying decals and making them look as if they are painted on.  They are still selling the same solutions today, and they still work beautifully.

Testors was beginning to supply paints in Federal Standard numbers.  And, Polly S was producing the first acrylic paints I had seen.  I never did get them to airbrush very well, but regular hand brushing them could not be beat.

And, speaking of airbrushes, I discovered them and taught myself to use it.  My first was a Badger Model 200, which I still have and use.  It is a single stage unit, and has been used so much it has been back to Badger for a re-build twice.  That tool will outlast me!

But what drew me into all this?  It is the sense of satisfaction I get out of researching the subject and then producing the best and most exact a replica I can.  I have become what I call an “amateur historian” of the Second World War.  My subjects tend to be replicas from Guadalcanal and the Cactus Air Force, Stalingrad, the Battle of Kursk or the Battle of Britain.  The list goes on and on.  I occasionally wander off into Vietnam, and build something such as the Grumman Bearcat I made with French markings as a personal commemoration of the incredibly brave French military men and women who fought to the bitter end at Dien Bien Phu in 1954, or the U. S. Army M551 Sheridan tank with the markings of an Arizona Sergeant who commanded the tank in our Vietnam War (said marking obtained from the IPMS/USA convention here in Phoenix a year ago).

I am not among the best model makers in the world, I enjoy putting most of my work up here for the few modelers who drop by now and then.  These modelers are from all over the world, and not a few from Russia (a country I visited in 1990 and 1991 during the waning days of the USSR and will never forget).

Model building has been a rewarding and involving pastime for me. 

And when I look at the new kits and materials available today (e.g., the Tamiya P-38E/G Lightning in 1/48th scale), I realize that in the world of scale modeling, these are indeed the good old days.

I know that I have not posted anything here lately, and that is because I have not been spending as much time at the workbench.

However, I am just finishing up an Eduard P-400 Airacobra and will be posting details here shortly.  Here it is almost done:


Sunday, September 8, 2019

Airfix Spitfire FR Mk XIV, 1/48th scale, Kit A05135


I have been looking forward to the arrival of this kit for some time.  The Mk XIV was the most advanced version of the Spitfire to see action in WWII.

A number of fairly critical kit reviews have appeared on YouTube from reputable channels, and that bothered me as I began the kit.  Unfortunately, the criticism was not unfounded.  For a kit that came on the market in 2019, the fit problems are simply not excusable.

I used three kinds of putty getting the airframe together:  Perfect Putty, Vallejo Acrylic Putty and Tamiya Putty. The gap between the wings and the fuselage and the lower air intake were the worst offenders.  Forward cowling top, part B01, has a loose fit, to be kind.

All the above being said, are these gaps a big deal?  I don’t think so.  I have come to expect this kind of thing with Airfix kits.  Just don’’t believe the hype in the British model magazines. These kits do not assemble as well as Tamiya or Eduard kits, nor are they as well-detailed.  But, they are a lot less expensive.

The kit is molded with the light blue styrene that is somewhat soft and has the tendency to tear even if you cut it very carefully.  I wish they used the same kind of plastic other manufacturers use.

Ultimately, with some extra effort, Airfix kits turn out okay.  And, getting decent models of such aircraft as the Spitfire Mk. XIV or the P-40C Warhawk, they are worth the challenge.  And, in the 1/72 range, the new Airfix kits are very nice.

In spite of some fit problems, I like Airfix kits. 

Some of the paints and other materials used:
    Vallejo Model Air 71.078 Gold Yellow
    Vallejo Model Air 71.003 Red
    Vallejo Model Air 71.080 Rust
    Vallejo Model Air 71.096 Panzer Olive (DarkGreen)
    Vallejo Model Air 71.049 Medium Sea Grey
    Vallejo Model Air 71.051 Barley Grey
    Vallejo Model Color 70.873 US Field Drab
    Vallejo Model Color 70.891 Intermediate Green

    Tamiya Acrylic X-18 Semi-gloss Black
    Tamiya Acrylic XF-71 Cockpit Green

    Microscale Micro Flat
    Microscale Micro Satin

    Tamiya Putty - White
    Vallejo Plastic Putty
    Perfect Plastic Putty

Pros
Very desirable subject.

Excellent decals with markings for two aircraft - one end of the war Spitfire in camouflage and one natural metal post-war version.  Very well-printed.  Went down well with Tamiya Mark Fit Strong.

Very clear assembly instructions.

Nice price for a 1/48th scale kit.

Cons
Number of gaps to fill.

Decals - prop logos shattered

All colors called out with Humbrol numbers only.  I made a chart translating those numbers to Tamiya and Vallejo paints before I started.


 As always, thank you for visiting my blog.  Comments are always welcome.

Monday, August 26, 2019

Airfix N.A. P-51D Mustang, 1/72 scale, Kit No. A01004A - VERSION TWO


The Kit & Build

The lead photo may look a bit strange.  This is what happens when one foolishly allows the family cat (a 15 pound yellow tabby named Mr. Rudy) to snoop about the model room and he sees a spot three feet off the floor to explore.  I call it the Cat-astrophe.  Mr. Rudy jumped and landed right in the middle of my slowly growing 1/72nd scale collection. 

A number of models were damaged beyond repair, including an Airfix P-51D in RAF markings I had previously presented here on this blog.  (Upper right in photo) It was such a nice little kit and such fun to build, I decided to do another one.  And, the Xtradecal sheet had many more aircraft markings to select from.

This iteration of the Airfix 1/72 scale Mustang comes with markings for a USAAF blue nose Mustang of the 352nd Fighter Group.  It is the same mold they have had in their catalog for a few years now.

How does it compare with the Tamiya kit, which I have also presented here?  In terms of detail and fit, Tamiya wins.  No surprise there.  However, the Airfix kit is nicely enough detailed and many dollars cheaper.  I enjoy building both manufacturer’s kits. 

My biggest complaint about Airfix is the panel lines are too wide and deep.  I recognize that more precise and detailed surface detail would add much to the cost of the kit, so I live with it depending what I am looking for. 

If I want a model that takes me months (off and on) to build and wow everyone with the result, I would start with the Tamiya.  If I am looking for a quicker build to add a particular aircraft to my collection (like a natural metal US aircraft in RAF markings), I am happy with Airfix.  I am in this hobby to have fun.  Airfix kits are fun to build. 

Another point about Airfix is that the plastic is soft and the sprue gates are wide resulting in difficulties with separating the parts from the runner without damaging the part’s surface.  For example, the radio antenna (not an example of the mold maker’s art in the first place) was impossible to remove without damaging it beyond repair.  The one on this model I fabricated from sheet styrene. 

And, sharp eyes may note there is no pitot tube on this model.  It suffered the same demise the antenna did the I tried to remove it from the sprue and since it is on the bottom of the right wing, I simply left it off.  If it had been on the leading edge, I would have made one from stretched sprue.

All the above being said, I am still very happy with the result or I would not be publishing it here.

Here are the paints I used:

Vallejo Model Air 71010 Interior Green
Vallejo Model Air 71-078 Gold Yellow
Vallejo Model Air 71.057 Black
Vallejo Model Air 71.103 Grey
Vallejo Model Air 71.003
Vallejo Model Air 71.063 Silver
Vallejo Model Color 70.988 Khaki
Vallejo Surface Primer 73.660 Gloss Black
Vallejo Metal Color 77.701 Aluminum
Vallejo Metal Color 77.702 Duraluminum
Tamiya Panel Line Accent Color - Black

I have been very pleased with the Vallejo Metal Color paints used in conjunction with their Gloss Black surface primer.  It was easy to achieve a natural metal finish and use the darker duraluminum for the panel around the exhaust pipes and the gun cover panels in the wing.  These paints are the first product I have used successfully to achieve a natural metal finish.  And, you can mask over the metal fish with Tamiya tape or Post-its with no fears of lifting the metal paint when removing the masking.

I use the Tamiya Panel Line Accent Color to bring out the surface details, and I am happy with the way it looks.  Somehow it gives the finish a more natural look.
Decals
 
Xtradecal X72131 P-51D Mustang Mk IV in RAF, RCAF and RAAF service provided the markings.  I chose the markings for No. 154 Squadron at RAF Hudson in March 1945.  According to Wikipedia, the squadrons that received the Mustang Mk IV (i.e., the P-51D) only had them during the final two months of the war.  How long they remained in service with the RAF after that, I do not know.  Since demobilization was fairly rapid, I doubt many of them were in active service by the end of 1946.


The finished model is rather small, as one can see from the Vallejo bottle. 
As always, thank you for visiting my blog.  Comments are always welcome.

Saturday, July 13, 2019

Eduard Spitfire Ixc Early Edition ProfiPACK (Converted to Late edition) Kit #8282


The Kit

Actually, the kit I used was an Early Edition, but all the parts needed for the Late Edition are in there too.  Some time ago, I had pirated the markings, the masks and some parts from this ProfiPACK kit for another project.  I put the reminder away for another day.

At some point, Eduard offered a Spitfire in Israeli Defense Force service markings.  But for the fact I simply had accumulated too many ProfiPACK kits in my stash, I would have bought it.

Then I saw Techmod decal set 48064, with markings for Spitfires in IDF service.   After examining this kit,  I found that all the parts for a Late Edition with the clipped wings and the cannons mounted outboard were all there.  All I needed were for the Late Edition instructions to identify the correct parts.   That was easily easily available on the Eduard website.

Confused?  I hope not.  The kit went together perfectly with no issues.  The Eduard Spitfires are well-known and do not require much recounting here.  This is my second Eduard 1/48th scale Spitfire, and I was again unable to figure out the odd arrangement of parts for the exhaust manifolds.  But that was no issue as they fit perfectly without all the parts called for.  Some of the parts are extremely small and difficult to work with.  However, patience will be rewarded.

Tamiya paint was used over Tamiya Surface Primer.  Colors used were:

    XF-10 - Flat Brown
    XF-19 - Sky Grey
    XF58 -  Olive Green
    XF-71 - Cockpit Green (IJN) - appears to be the same of Pale Green RAF cockpit color.

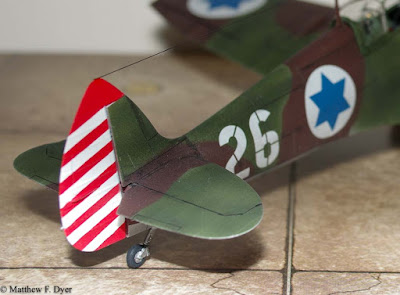
The red stripes on the tail were masked off and painted and came out really well.  I used Vallejo Model Air Red/RLM 23, 71.003.

The Techmod decals work very well and settled down with Tamiya Mark Fit (regular strength).  Mark Fit Strong should be reserved for heavier decals, such as Tamiya's own.  Techmod decals come from Poland, and they are very high quality and beautifully printed.  Full color instructions/diagrams are included.  This is my second model using them, and I am quite pleased.  I obtained mine from Hannant’s in the UK.


Historical Information
Looks like White 26 has been reduced to gate guard status.  Or maybe it is another one.  My research told me that the Czechs painted over the RAF Dark Sea Grey with Dark Earth and left the Dark Green and Medium Sea Grey alone. Who knows for sure about these things with no contemporary color photos?   Photo by Oren Rozen.   

Operation Velvetta  involved the ferrying of some 60 Spitfires purchased by the the newly created State of Israel in 1948 from Czechoslovakia at $23,000 per plane.  Israel was involved in a rapidly expanding war with their Arab neighbors.  See Wikipedia article here.

During the war, there was actually an air battle where Egyptian Spitfires fought Israeli Spitfires.   Another ironic fact is that Israel also flew a number of Bf109 ex-Luftwaffe fighters.

Although the U. S. was the first country to recognize the Jewish state upon its creation, the arms cornucopia had not opened at that point.  Israel had to make do with what could be bought on the open market.  Only 4 years after the end of World War II, there was a lot of war material available for purchase.

I was very pleased to be able to add this Spitfire to my collection.

 As always, thank you for visiting my blog.  Comments are always welcome.